Showing posts with label freehand. Show all posts

Sunday, May 4, 2014

French Daisy

YOOO how are y'all doing? What a long hiatus that just was. My b, guys. I've been mondo busy with work and traveling again and life, and my nails have been super ugly for eons. But now today, since I'm about to repaint my room back to boring white (yuck) to prep for moving, I decided to paint my nails super cute, because that makes sense. I'm sure they'll make it just fine through the painting process. (A four part chorus of laughtracks can be heard in the distance at this point.)

Anyways, here are my super lazy summery sunday nails! I was inspired by a post on tumblr, as well as my favorite perfume, Daisy by Marc Jacobs. They have such cool lookin ads and bottles, right?? I started off with a base of Duri Rejuvacote to keep my talons strong n long, then added two coats of Essie Sugar Daddy, aka the most perfect crelly baby pink in the whole world. After a day of being too lazy to continue the mani, I pulled out Mabelline Porcelain Party, China Glaze Happy Go Lucky (wow what a fun name combo), and my dotting tool, and went to work. A coat of Gelish topped them off with a super fab shine, and in the rare event that I don't cover them in white paint within the next 3 hours, it'll keep them chip free for like 4 days. Go me!

Ok but really guys this mani was super easy. Try it! Try it right now!!


Wednesday, December 11, 2013

Week 2: Winter Nature (or: Have a Holly Jolly Christmas)

Howdy hey buddyo! I've been really excited to do these nails since the moment I ordered A Fresh Evergreen and Very Ornamental, both by I <3 NP, one of the most lovely of all pseudo-mainstream indie nail polish brands. (I also ordered Nostalgia and Princess Diaries in the same shipment. It was a really exciting package to receive, to say the least, and you'll be seeing those other shades pretty soon I'm sure.) Both of these colors are from the special seasonal collection, as indicated by their names, and so I knew that I had to incorporate them into this winter nail challenge.

Winter foliage? Plants? Red and green??? HOLLY. I love holly. It's so bright, it has weird effects on birds, and it's very festive.


Info and more pictures under the cut:

Sunday, December 1, 2013

Hello Winter!

It's December! Here in Chicago, that means one big thing: it's cold. Really cold. But hey I love the cold so no biggie. This cold is just ushering in Eggnog And Hot Beverage Season, one of my favorite times of all. In an attempt to capture the warmth of this chilly season, I painted my nails using Sally Hansen Sugar Coat in Red Velvet.  I got this lovely shade from a clearance bin, and boy am I glad I picked it up!! It's a very rich burgundy berry shade, and it's quite festive. The sugar coat texture is really nice, and reminds me of the way that Zoya Pixie Dust polishes look in the way that it sparkles. It covered really well in one coat, but I did two for added depth. Although it was really pretty on its own, I couldn't resist stamping it with some of the winter stamps that I've been chomping at the bit to use for months!!


Monday, August 19, 2013

Geometric Pastels

Hello lovelies!! Ok so I'm particularly proud of this design, because my goal was to test my skills. (What skills, you may ask? I weep a little.) I wanted to make this mani LOOK like a taped mani. BUT!! The catch was that I wasn't going to use tape!! I wanted to see how clean and neat I could make my lines just freehanding them. And dang I think I did a pretty rockin job. :3


Colors used were: China Glaze Refresh Mint, China Glaze Always A Lady, China Glaze White On White, and OPI Oy-Another Polish Joke.

Love me.

Easy Waves

Hello lovelies!! Wow I've been gone for a while, sorry about that! I haven't given up on nail blogging of course, I just graduated college and so I've been dealing with the craziness of moving back home for the summer. Also I got a dog, so he's been taking up most of my attention. Seriously, how can you not love this face??????!?!?


Ahem. So anyways I've been training him and neglecting my nails a bit. But! That doesn't mean I haven't been doing them at all!! Last week I did these lovely wave-style nails, and they were super fun and easy!! I'd suggest them to anyone who doesn't really have time to do something fancy but still wants some ass-kickin nails. 


Colors used were OPI Yoga-ta Get This Blue, OPI Can't Find My Czech-book, and OPI Fly.

Saturday, May 11, 2013

ATLA nails!

Hello lovelies!! Two posts in a day because today was a big day in nail painting. I guess. Actually it just kind of happened that way. So anyways! My friend came over and asked me for Avatar: The Last Airbender nails, and as an avid fan of that show, how could I refuse!! I decided to do all of the nations' symbols on her fingers, and then the avatar arrow on her thumb. The base for this was China Glaze Kalahari Kiss, and I just used whatever I could find for the other fingers but I don't want to list them because they're spread out all over my bed.


Day 6: Greed

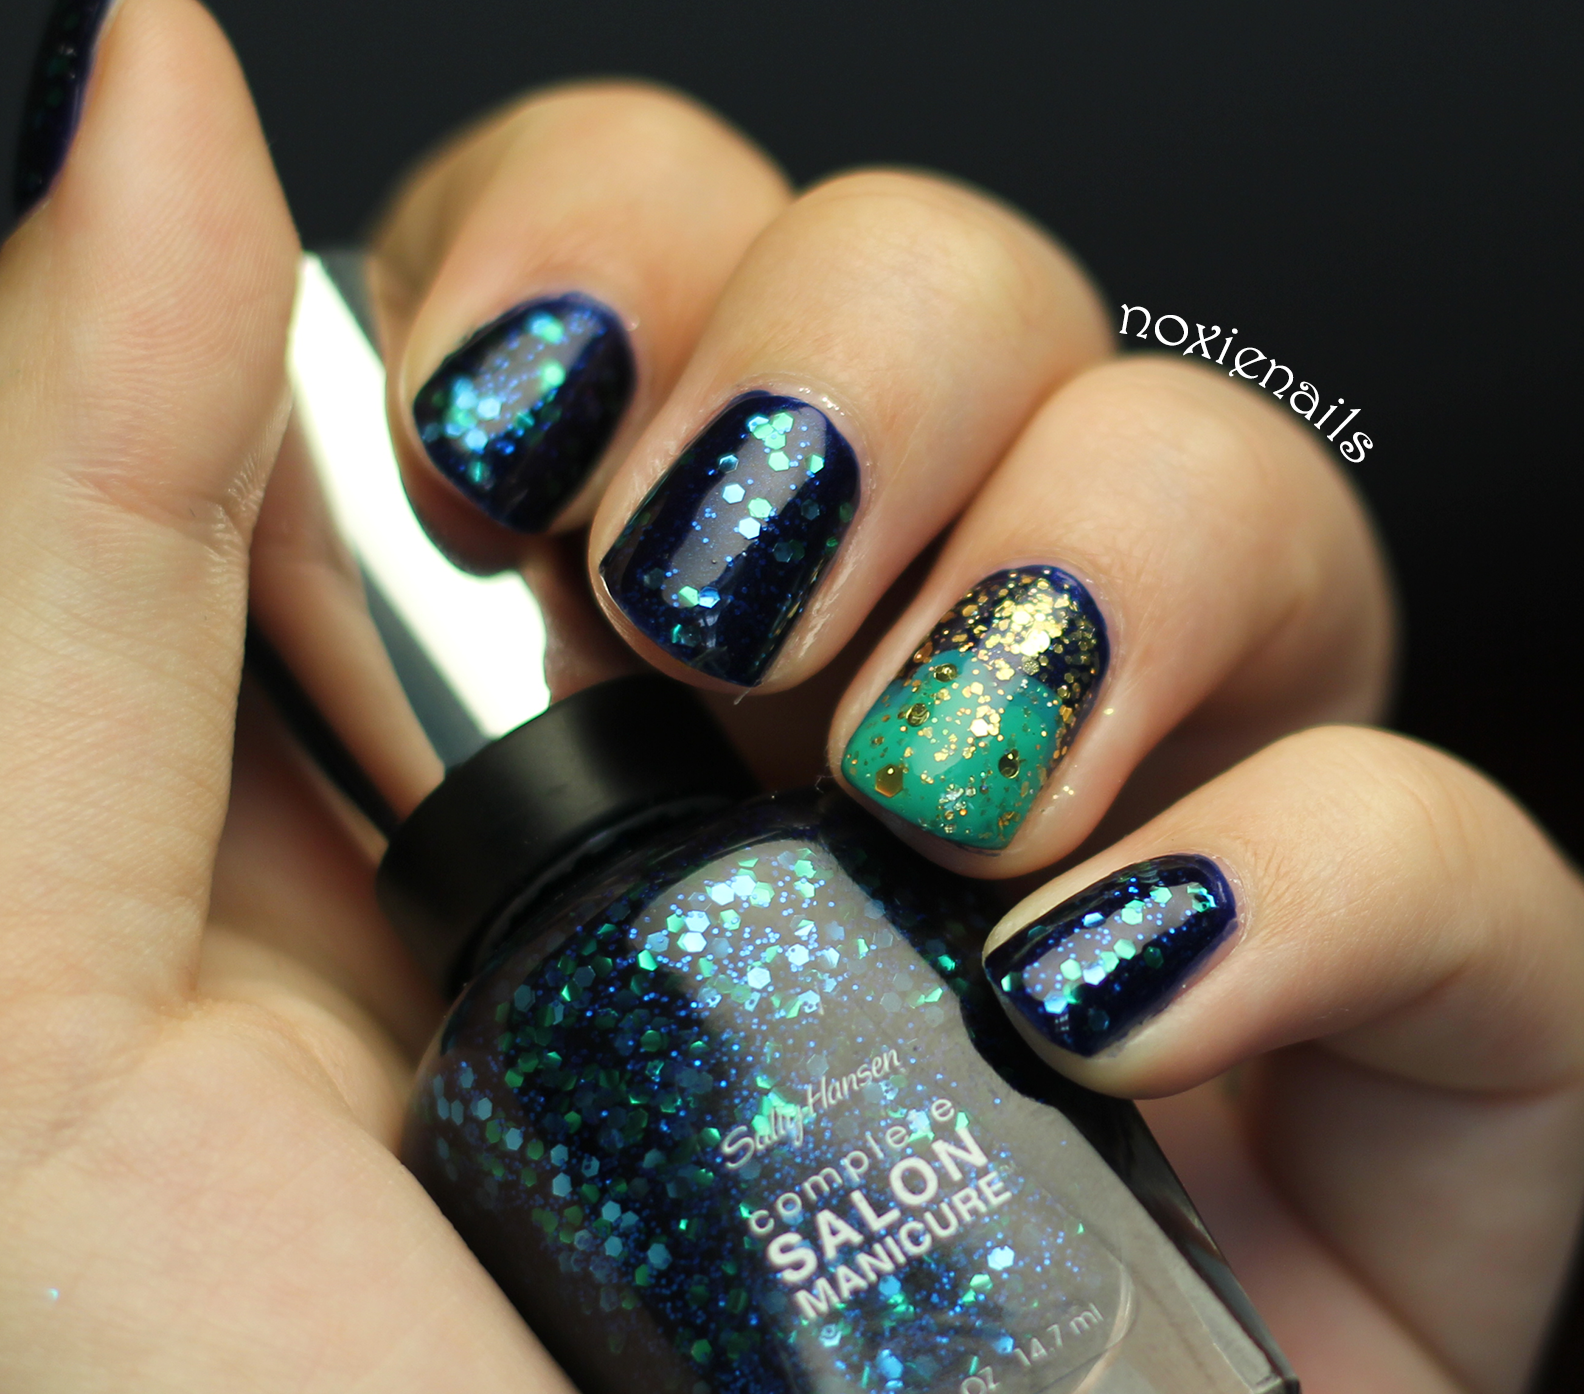
Hello lovelies! The theme for today was to go all out, so I did!! There's glitter galore on these deep blue mermaid-themed nails, and they look fab! Plus mermaids are known for collecting things, and thats somewhat greedy... right? (Goddamn it Ariel.)

For this mani, I used a base of two coats of OPI Yoga-Ta Get This Blue!, and topped that with Sally Hansen Mermaid's Tale. For my accent nail, I used a coat of I <3 NP's All Gold Everything, which I've been super stoked to use for AGES! (I got it from etsy so it's one of my extra-special babies.) On top of that, I used OPI Fly, and then China Glaze Four Leaf Clover, which I thought gave the nail something of a mermaid-scale look. However, the matte colors looked too plain to me, so I threw another coat of All Gold Everything onto it before topping everything off with two thick coats of SV. If you guys think it looks killer on here, imagine how great it is in person!!


Friday, May 3, 2013

Day 4: Gluttony

Hello lovelies! For the second part of the Gluttony element of the seven deadly sins challenge, I decided to incorporate some summer fun and do watermelon nails!

For the inside of the watermelon, I started off with two coats of Estée Lauder Hot Coral, topped with a coat of OPI Thrills In Beverly Hills Top Coat to make it look wet and kissed by sunshine. For the rind I used Sinful Colors Envy and Wet n Wild Mint Fusion, with China Glaze White On White for the shiny bit and the inner rind, and Wet n Wild Black Creme for the seeds. I did the seeds with a dotting tool, and I'm kind of disappointed with how they turned out. Who knew making seed shapes would be so dang hard??


Thursday, May 2, 2013

Day 3: Gluttony

Hello lovelies!! Last night I completed day 2 of the seven deadly sins challenge, Gluttony! The prompt was a gluttony-inspired sugar-spun mani, so I decided to go with a fudge-drizzled minty look. I had never done a sugar-spun mani before, so I was excited to try it out. My biggest surprise was just how much polish it uses!! But I think it was worth it, they came out adorable! I tried a number of ways to get the look right, from super thin streaks to big thick gobby streaks, and I think the thicker ones got across the "chocolate" look better, so I mainly went with those.

I used China Glaze Re-Fresh Mint for the mint, Love & Beauty by Forever 21 Coffee, and Wet n Wild Black. No topcoat because I wanted them to stand out!


More pics~

Wednesday, May 1, 2013

Bam! POW! Batman nails!!

Hello lovelies!! Today my friend Jenni is guest starring on my blog as a lovely hand model for a Batman Mani! (Or should I say Batmani?? No?) For this, I tried to go with the traditional comic-book feel, so I looked up some designs online for Batman nails and comic book nails in general, and went at it! I used China Glaze Happy Go Lucky for the yellow, Revlon Graceful for the gray (it ALWAYS looks beige in the bottle, but I've learned from enough mistakes that it is, in fact, actually gray), China Glaze White on White, and Wet N Wild Black. I really like the limited color palette, because I think it keeps everything very cohesive and consistent.

To get the designs, I used the nail art brushes that just arrived in the mail today (I'm so excited about them, you have no idea), along with my teeniest dotting tool to get the dot effect behind the speech bubbles.

More under the cut!

Sunday, April 28, 2013

Spring Polka

Hello lovelies! I went to an event with some friends yesterday, and after one of them was shocked to find that I hadn't redone my nails in around three days, I jumped right on that and popped out a new design! I gathered up a rainbow of springy pastels, along with my brand new (and super cheap) dotting tools that I ordered on Amazon, and set to work! The dotting tools are super cute, although they took a while to get here (around 3 weeks, as they're from China), but with how adorable the set is, and for how cheap they were, the wait was well worth it!

For this mani, I used Butter London Trout Pout, China Glaze Peachy Keen, CG Lemon Fizz, CG Re-Fresh Mint, and CG For Audrey for the base colors, with CG White On White for the dots. The dotting tool was super duper easy to use, much better than the toothpicks and other makeshift tools I've been using!


More pics under the cut! <3

Sunday, April 21, 2013

PUNK as heck yo

Hello friends! I've been wanting to do nails inspired by one of my pals for a while, so here they are! I just kind of took a bunch of things that remind me of them, and combined them to make these fabu nails. For the pale yellow I used China Glaze Lemon Fizz, the darker yellow on the tips is China Glaze Happy Go Lucky, and the dark blue is a Sally Hansen blue nail pen.

I have a punk lifestyle!

Also on the thumb, it's two angel wings and a halo, but if you look at it upside down, it looks like a sloth face. Just what I've always wanted on my thumb!

Wednesday, April 17, 2013

Outta This World!!

Hello lovelies! I've been wanting to do a space mani for oh-so-long, and I decided that now that I have my super cool space shoes, now's the time!! That, and I got a box of Color Club's new Halo Hues, a set of 6 super rad linear holo polishes. When I opened the box, I knew they'd look super fab in a space mani!

I used the tutorial here to learn the basic concepts, and then added my own colors to it!! I kept dabbing and splotching on whatever I thought might look cool, and here's the result:
Right Hand
Left Hand
I'm kind of frustrated that, as has been happening a lot lately, the right hand came out looking TONS better than the left. I'm a righty!! What's going on! Then again, I guess it's because: 1. I did the left first, so that's where all the learning process happened, 2. I used Color Club Beyond as a base on the left, which is more of a charcoal gray with holo than the Wet n Wild Black that I used as a base on the right hand. Plain black is definitely a better base color.

More info under the cut!

Tuesday, April 16, 2013

Matte about... Matte!

Hello dolls! Quickie bonus post because I just received Essie Matte About You in the mail, so of course I had to matte-ify my current mani. Holy smokes I love it so much better now! Leopard spots look way more natural matte, almost like they came from a kit or something :) I feel so pro!


Sunday, April 14, 2013

Neutral Neon Leopard


Hello lovelies! Today I decided to do something I've been wanting to try for weeks... leopard nails! I've been holding off because they look pretty time consuming, but I had some time yesterday and today that I could devote to them. Another thing that spurred me into creating this pattern was the arrival of a few new polishes: China Glaze Sugar High, OPI (Nicki Minaj) Did It On Em, and Julep Debra. I knew that they'd all look fab when combined, and I was right! I studied some tutorials to learn how to make the perfect leopart effect, and then set to work.

After painting on a nice base coat of Duri Rejuvacote, I painted on a base of Debra on my index, middle, and pinky fingers, and The New Black Glimmer Twin on my thumb and ring fingers. I was a little disappointed with Debra, the application was super goopy and thick, so I actually only used one coat of this as a base. Then again, I did get it for only the price of shipping from Julep by signing up to be a Maven and using the code FREEBOX, so for a basically free polish, it was awesome. Glimmer Twin was a bit streaky, and took two coats to look nice, but I think it dried really nicely.

Next, I used the applicator brushes from Sugar High and Did It On Em to make a bunch of randomly-shaped dots on all my nails. Since the polish was a bit thick on some of these dots, I waited a while for them to dry, and then used a toothpick dipped in black paint to outline the dots randomly using Wet-n-Wild Black. I broke off the end of the toothpick so that it wasn't too pointed, and that worked pretty nicely to use as a tool.

Overall, I'd say this took me about three hours, but a lot of that was just waiting for the polish to dry, so I definitely did other things while I waited. I really like the way this came out, so you'll definitely be spotting more leopard print from me in the future! :)

Wednesday, April 10, 2013

Mermaid French Tape Mani


I've been in love with Revlon Minted for a while now, but it's sometimes just not quite blue enough for me. When I was checking out my stash, I realized that I had literally ZERO creme blues. So of course I went and immediately ordered the beautiful China Glaze For Audrey, a gorgeous exact match to Tiffany's shade of blue. When I got it, I just kind of admired it for a little while before trying to figure out what I was going to actually do with it.


Another polish that I've been ogling over for a few months now is OPI Mermaid To Order, which came in my big Sephora by OPI pack of minis. (What a great Christmas present that was!!) It's such a unique shade of blue though that I've had trouble trying to decide what I wanted to pair it with, but after holding For Audrey up to pretty much everything in my collection to find the best match, I realized that these two beauties looked like they were made for each other.

For Audrey went on perfectly smoothly and completely covering in one coat, but the idea of only having one coat of a main color on my nails is preposterous to me, so I threw a second coat on. I decided to try a tape mani for this design, and thought the colors I picked would look fab with a triangle French design, so I taped off my thumb after giving For Audrey about an hour and a half to dry (plus my UV nail dryer!!), and... realized that the tape was waaaay too tedious. The designs were coming out off center and crooked no matter how hard I tried, so I decided that I have a steady enough hand and just freehanded the rest of my nails. I think they came out great!

The colors blended together a little too much for my taste once I got them on my nails, so since I wanted them to stand out, I outlined the border using my Sally Hansen Nail Art Pen in White. The white one is my favorite because it's super opaque and easy to use; I was even able to do my right hand and make it look nearly as perfect as my left!! (I didn't take pictures of it, but trust me on that one.)
Overall, I'm super satisfied with this mani. Not only are the colors gorgeous together, but the quality and formula of each polish was flawless. I'm pretty sure this is my favorite mani I've done in a while!!

Let me know what you think :)

More pics under the cut!

Saturday, April 6, 2013

Graynbow (gray + rainbow?? yeah)


So originally this was going to be a luau mani. I picked the colors so that they'd be super island-y and tropical, and I was really excited planning out all the designs and patterns for each nail. I had some gradients done, I was gonna stamp flowers over the gradients, I even tried doing a water marble on my thumb!! (And it almost worked!) But then, suddenly, everything went to hell. I smudged the water marble, I smudged my stamping, I smeared topcoat everywhere, so I decided to take all the polish off that hand and start over.

However, I left the base of white and sand on my right hand, and finished up the mani by just doing colored tips and some stripes, as you can see below. I decided, then, to be the left hand the opposite!! So you can see that below. I'm really dissatisfied with this mani and I'm going to take it off as soon as I can, but I didn't have time to redo my nails tonight so I left them on.


Also I'm finally throwing this bottle of yellow polish away because even though it's completely GORGEOUS on the nail, it's so old that it takes around 8 years to dry, and messes up pretty much every mani that I use it in. :(


Friday, April 5, 2013

Golden Peach

So my original idea was that I was going to use my brand new bottle of China Glaze Peachy Keen along with my Sephora by OPI Keep Me On My Mistletoes in order to create a fun outlined nail design. Then, since I’m so excited about my Bundle Monster plates, I threw on this design from plate BM-315. After I got my left hand done though, I decided it looked waaaaay too busy, so I just did the tips on my right hand. I like the simpler design much better!!

I used one coat of Gelish and then one coat of Seche Vite to seal it all in, and it’s actually still not dry. (Even though I used my UV nail drying lamp!!) They’re dry to the touch, but with two coats of (very slow drying) Peachy Keen, and two coats of KMOMM, the tips are still very wet inside. Still, I definitely love this color combination, and I’m really excited that I ordered Peachy Keen :)

Happy Easter!


I did some easter nails!! I ordered a pink jelly glitter nail polish called Deluxe Model Pink from Sneaky Laquer on etsy a few days ago, and within minutes of it arriving I knew I had to incorporate it into my super cute easter nail design :) I know it says on the site that their pictures show only two coats of DMP, but I had to apply 4 before I could get the effect I wanted. Regardless, it’s been holding up beautifully!!

For the green I used Wet n Wild Mint Fusion, the white was White on White by China Glaze, and the solid pink was Trout Pout by Butter London!! I’m really happy with these nails, they look so great!!

My only complaint is that the two coats of Seche Vite topcoat I used caused a bit of shrinkage at the tips of all my nails, but the glitter was thirsty enough that it definitely needed it. I might go back to Gelish, because I don’t get shrinkage when I use that.

Minty Gold


I just got way inspired looking at a bunch of nail art blogs!!! For this I used China Glaze White On White, Revlon Minted, and Butter London West End Wonderland. I used two coats of Gelish as a top coat, and it smoothed out the grit of the glitter really well. I’m really excited about this color combination, so hopefully it lasts for a few days without chipping too bad!!

This pic is more of a bonus, because I thought that the white and gold looked so good together plain, but then I finished it up and made em all decorated. I’m also super excited because the right hand came out just as good as the left. :)

Related Posts Plugin for WordPress, Blogger...